Saint Anthony’s Feast & Saint Lucy’s Feast: A Double Header of Italian Street Festivals

By Dana Ferrante ’17

Unlike a restaurant, food truck, or vending machine, the opportunity to go to saint feasts only comes around once a year. No cancellations, no rain checks. These feasts come, they conquer, and they make you wait a whole year for their next appearance.

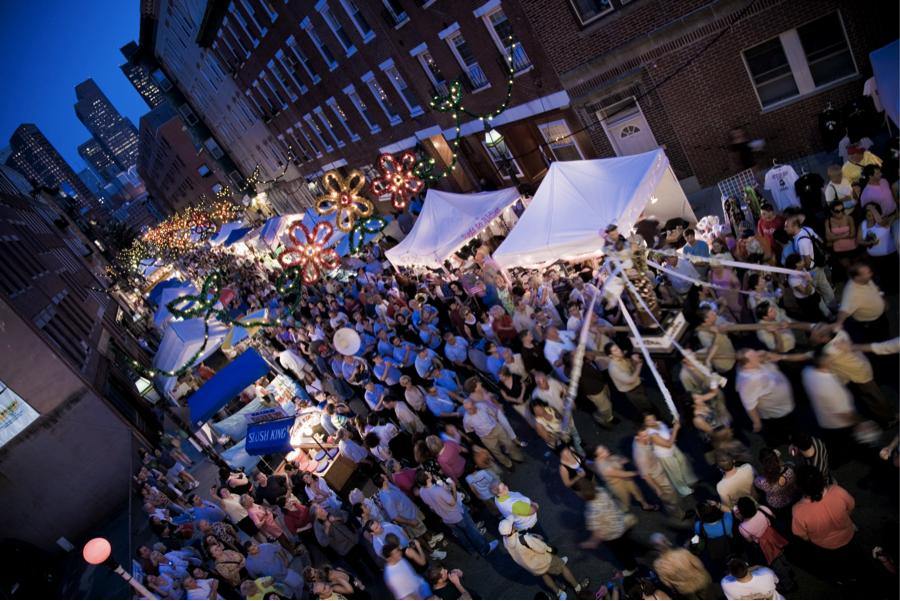
We don’t want you to miss out, so mark your calendars for August 29th-31st, when Saint Anthony’s Street Festival takes over Boston’s North End. For anyone out there who has never been outside Harvard Square, the North End is basically Boston’s “Little Italy.” It’s where you’ll find the city’s best cannoli, more fettucine alfredo than you’ve ever thought possible, and of course, gelato on every street corner. While we highly recommend that one day you make your way to Hanover Street (essentially the Appian Way of the North End) to discover for yourself what treasures lie down its winding alleyways, there’s no better time for an introduction to this Italian-American village than Saint Anthony’s feast.

Source: http://www.yelp.com/biz_photos/st-anthonys-feast-boston?select=rHKXTUiPcgzSv9HoDyUK9A#rY0IvspFhTGUc4ReRNSBVA
St. Anthony’s festival in the heart of the North End/

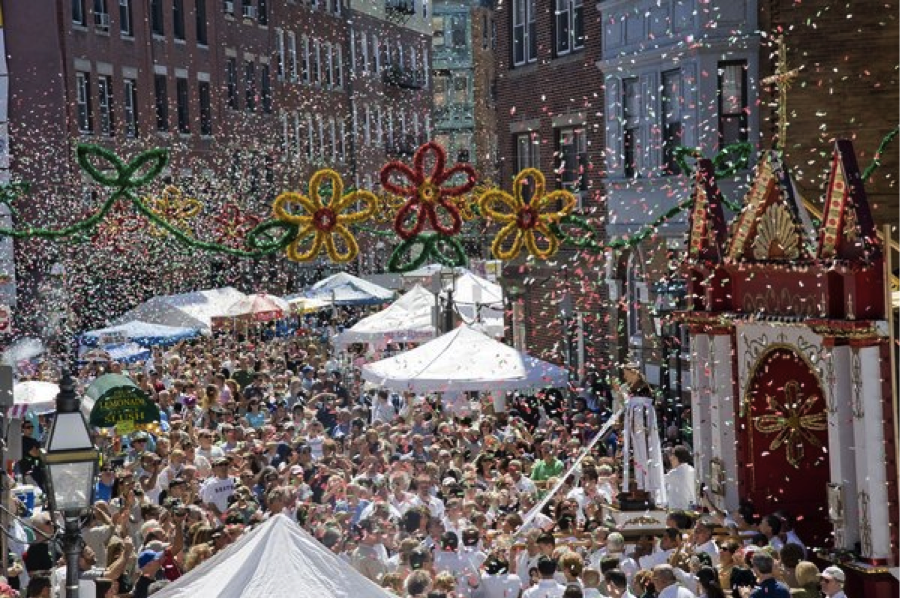
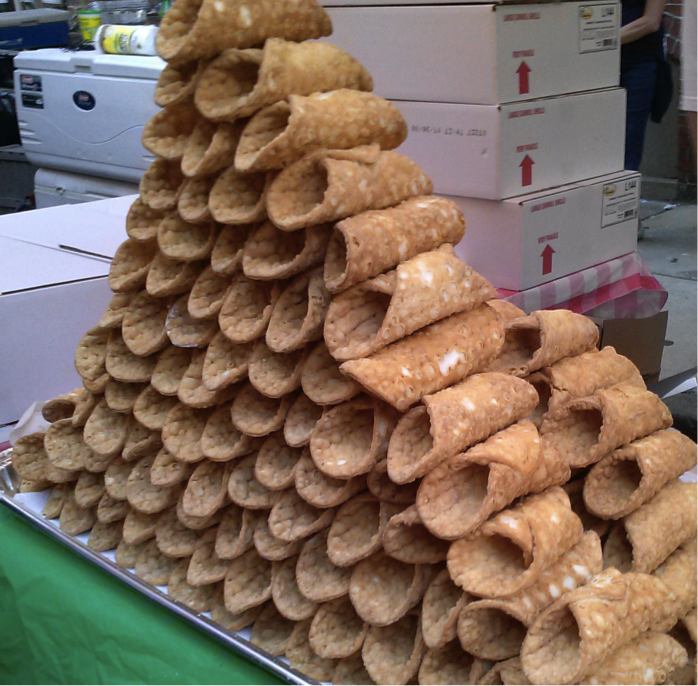
Opening ceremonies begin with a small procession of Saint Anthony on Friday at 7pm, with a musical performance starting soon after at 7:30pm, but the real party starts (and practically never finishes) on the weekend. By noontime on Saturday, the Streets will be flooded with white stalls, as local businesses offer their best to the hungry crowds. Arancini, calzones, cannoli, calamari, hazelnuts, sausage and peppers, torrone, pizzele, clams, caprese sandwiches —and that’s just the beginning.

Source: http://discoveringflavor.files.wordpress.com/2013/08/cannoli.jpg
Stacked cannoli shells, ready to be filled with a creamy ricotta filling.

Throughout the entire weekend, Pizzeria Regina will be at the open air piazza selling pizza, Stella Artois, and of course, vino, produced by The Naked Grape. This year’s festival also features a tasting tent and culinary stage sponsored by Filippo Berio Olive Oil and New England Center for Arts and Technology. While at the tasting tent, you can try several varieties of Filippo Berio olive oil using Parziale Bakery’s freshly baked bread and learn useful olive oil tricks and tips. And if you like cooking just as much as you like eating, don’t miss the culinary stage, where local chefs will be showcasing their best Italian dishes. Demonstrations and tastings will run throughout the entire weekend, so whether you attend on Saturday, Sunday, or both, you won’t miss out on any of the culinary spectacle.

Amidst this gastronomical playground, there will be live music, masses, processions, dancing, carnival games, confetti, and of course, a giant statue of Saint Anthony covered with paper streamers by the time Sunday night rolls around.

And there’s more. The party and religious devotion continue onto Monday September 1st , with the celebration of Saint Lucy, complete with celebration and music throughout the day and a nighttime feast. If you didn’t have room for a sfogliatelle (also called a lobster tail) or arancini the first two days, you have one more chance to fill yourself up with Italian deliciousness.

In summary, these back-to-back saint feasts offer great food, a lively atmosphere, and a perfect opportunity to use that Italian accent you have been working on.


For a full schedule of events and times, check out the festivals’ website at: http://www.stanthonysfeast.com/schedule.html.

Watermelon and Feta Salad

By Dana Ferrante ’17

Nothing tastes more like summer than a bite into the juiciest, pinkest, piece of watermelon and having that sweet pink liquid drizzle all down your face and hands. But watermelon is more than just a sticky finger food: try this simple recipe for watermelon salad, and turn a summer snack into a refined, fork-worthy dish.

But first, what makes or breaks any watermelon salad is, of course, the watermelon. Picking a watermelon is always a gamble. You see a flawless, green speckled watermelon skin and you think “This is going to be the best watermelon I will ever have.” Soon after, you discover the watermelon to be subpar, not nearly as mouthwatering as you had suspected. Here’s how to prevent any further watermelon-induced disappointment:

Step 1. Find a watermelon. Pick it up. Is it heavy? It should feel heavier than you would have suspected for its size. Is it shiny? It shouldn’t be if it’s ripe.

Step 2. Turn the watermelon around until you find the field spot, or the side of the watermelon touching the ground as it was growing. Just like this pictures shows, the field spot should have a yellow, creamy color. The darker the yellow, the better, since more time on the vine means more time to ripen.

watermelon field spot
A cream-yellow field spot.

Step 3. Knock on the watermelon rind with your knuckles. You shouldn’t hear a dull thud, but a lovely hollow sound that means your melon skin is firm and ripe. It’s almost as if your knuckles bounce off the rind when the skin is good and ready.

Now that you know how to pick the perfect watermelon, it’s time to learn how to turn that giant green melon into a succulent salad.

You’ll need…

-a cutting board

-a chef’s knife

-a salad bowl

Serves: 6-8

  • 1 small seedless watermelon (or half of a large seedless watermelon)
  • 1 medium red onion
  • 1 ½ cups of Greek feta cheese (not pre-crumbled)
  • ½ cup of basil (or mint)
  • 2 tablespoons of extra virgin olive oil
  • 1 lime (or ½ lemon) OR 1 tablespoon of lime (or lemon) juice
  • 2 tablespoons of balsamic vinegar
  • Sea salt and ground black pepper to taste


Directions:

Cut watermelon into 1-inch cubes, or use a melon baller to make bite size pieces. Slice red onion into half moons. Slice the block of feta in ½-inch cubes. Chiffonade basil (or mint). Then, put all these ingredients into your salad bowl.

Drizzle EVOO, lime (or lemon) juice and balsamic vinegar, and then toss. Season with sea salt and ground black pepper to your liking.

A Chocolate Chip Cookie Upgrade: Neiman-Marcus Cookies

By Dana Ferrante ’17

Who doesn’t like a cookie and a little controversy? The Neiman-Marcus cookie recipe has been circulating on forwarded emails since the invention of email itself. Long story short, a woman resorted to paying $250 for a recipe she thought was going to cost her $2.50, and as her sweet revenge, she decided to send the recipe to everyone she knew. Whether you bake them to “stick it to the man” or because two types of chocolate in one cookie seems revolutionary, these cookies will without a doubt disappear if left unattended.

Edited Neiman Marcus

Yield: 112 Cookies


Note: Yes, 112 cookies. If for some reason you don’t want that many cookies at once, the cookie dough keeps very well in the freezer. While you could just simply halve the recipe, it may be worth your while to bake just a few batches and store the rest in a sealed container in the freezer for a rainy day. Trust me, it’s great to make cookies and only have to wash half as many dishes. With that being said, make sure you take the dough out of the freezer before you want to start baking; I suggest 1-2 hours depending on the size of the container.

Equipment:

  • A food processor (or blender)
  • Cookie sheets
  • Hand mixer optional

Ingredients:

  • 2 cups butter (softened)
  • 2 cups granulated sugar
  • 2 cups brown sugar
  • 4 eggs
  • 2 tsp. vanilla
  • 2 tsp. soda
  • 2 tsp. baking powder
  • 1 tsp. salt
  • 4 cups flour
  • 5 cups oats (blended to a fine powder in a food processor or blender)
  • 24 oz. chocolate chips
  • 1 8 oz. Hershey Bar (grated or blended in food processor)
  • Optional: 3 cups chopped nuts (we suggest walnut)

Directions:

First, use food processor to blend the oats into a fine powder; set aside in a bowl. Next, grate the Hershey bar using either a standard hand-grater, or by breaking the Hershey bar into quarters and blend with food processor until broken into small bits about the consistency of brown sugar; set aside. Be careful not to blend the bar too long, or pieces will begin to melt and crumble together.

Heat oven to 375 degrees Fahrenheit. In a large mixing bowl, combine the softened butter and both sugars. Once well-combined, add the eggs and vanilla. Next, mix in the flour, oatmeal, salt, baking powder, baking soda and salt. Finally, add the chocolate chips, Hershey bar bits, and nuts if you are using them.

Using a cookie scoop, spoon, or your hands, form the cookies into about 1-inch balls. Leave about 1 ½ inches to 2 inches between cookies when placing them on the cookies sheet; they will spread out! I personally am a fan of the 3-2-3-2 cookie formation, but any arrangement will do the trick.

Bake each sheet pan for about 10 minutes at 375 degrees Fahrenheit.

Since this is a butter cookie, make sure to keep them in a sealed container (if they even last that long before being eaten!).

[Where can you find a blender on campus? Try the Women’s Center kitchen in Canaday B Entryway or the Freshmen Dean’s Office.]

Neiman Marcus cookies and milk
They go great with a glass of milk!